Making anti-skid bracelets with your own hands is not difficult. Always take them with you, they will take up a little space in the trunk, and on occasion will greatly improve the permeability of your car. This self-made means of increasing the cross-country ability of the car is in no way inferior to the factory counterpart. For outdoor enthusiasts, fishermen and hunters, a device that can quickly improve the vehicle's patency is simply irreplaceable.
Several ways to increase the cross-country ability of the car
- Installation of off-road tires with large and high tread elements on wheels.
- Putting chains on wheels.
Tires with high lugs have high rolling resistance, which significantly increases fuel consumption. They also make a lot of noise, so riding them is uncomfortable. Even more costly and uncomfortable riding on chains. To put the chains on the wheels, you need to raise the car on a jack. That is not always possible due to the jack falling into the mud or snow. Therefore, it is quite difficult to put on chains on wheels before off-roading.
The device and advantages of anti-skid bracelets
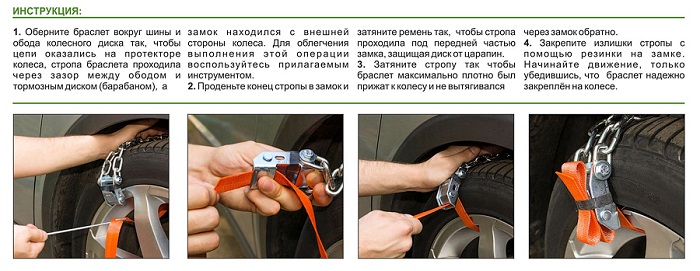
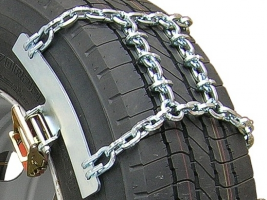
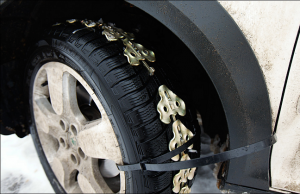
An anti-skid bracelet consists of two pieces of chain with pairwise connected ends and two straps, one with a buckle and the other free. It is put on the wheel so that the chain, forming lugs, lies on the tread in two rows with a small gap between them. The free end of the strap is threaded into the hole in the wheel rim, and after tightening it is fastened with a buckle on the other side of the bracelet. Of course, one bracelet worn on the drive wheel is not enough to significantly increase cross-country ability. A set of bracelets usually consists of 6 pieces. For a car with one drive axle, this is sufficient. For an all-wheel drive vehicle, it is better to buy or make two such kits. You need to put on bracelets 3 pieces for each drive wheel at regular intervals. You can buy such kits or make yourself. The main advantage of bracelets over chains is that they can be put on wheels without lifting the car with a jack. That is, putting them on in front of a problem section of the path is not difficult, and you can move on a good road without them. They can even be worn on a stuck vehicle.
The effectiveness of the use of bracelets is also high as of chains, since the lugs are formed in the same way.
But do not overestimate the increase in cross-country ability with their help. If the car lies underneath on mud or snow, they will not be able to help. The advantages of this device, of course, include low cost and operational safety. If the fastening belt breaks, the bracelet will simply fly off the wheel without causing damage to the body. Some sources point to increased rubber wear when using this device. I think that if you don't wear bracelets all the time, then the wear will not increase.
Oddly enough, but in our country, anti-skid bracelets are not as widely used as in Europe, which is snow-free by our standards. This is explained, apparently, by the complete prohibition of studded rubber in some countries, and the long-term habit of drivers to have such a device with them, just in case (such devices have been used there since the 20s of the last century). And the fact that there are roads there, on which, under certain conditions, without such an accessory is prohibited. Also, apparently, plays a role. They even have special road signsthat open or close depending on weather conditions.
For those who want to make bracelets themselves
In order to make DIY anti-skid bracelets, you need to stock up on some materials. For one bracelet you will need:
Cargo straps
From the tool you will need: two open-end wrenches in the size of nuts and bolt heads, an awl and a needle. It is not necessary to measure the tread width to find out. This dimension appears in the designation on the sidewall of the tire. This designation looks like this: XXX / 70 R 14 the first three digits are the tread width in millimeters.
The chain can be bought at a professional fastener store or in the usual household department. Look for a buckle lanyard at a climbing equipment store. Once the materials and tools have been collected, manufacturing can begin.
Take one of the bolts, put a washer on it, and after it the extreme link of one piece of chain. Now put on another washer and tube. If there is no tube, screw 4 regular nuts and stretch the structure. Put on the washer and the outermost link of the other section of the chain. Close the link with a washer, screw on the self-locking nut and tighten it. Similarly, fasten the other two edges of these chain segments together. After the edges of the lines are connected. Bend the free end of the strap or strap with a buckle around one of the bolts, pull it towards the buckle and often sew with nylon thread using an awl and a needle. The length of the end with the buckle should be about 10 cm. In the same way, attach a strap or sling without a buckle to another bolt. Leave the length of this end a little longer for the convenience of fastening, if necessary, it can be shortened later.
Useful little things
Selection of ready-made bracelets
The choice of ready-made bracelets is simple. Available for sale, they are divided into three size categories: small (for cars), medium (for vans and SUVs) and large (for trucks). In order not to make a mistake in the size, remember the tread width of the wheels of your car, measure and compare the length of the bracelet chains with it. The length of the chains should be approximately 5 cm greater than the tread width. Assess the reliability of the attachment of the belts to the chains. The fastening of the belts must necessarily overlap, and threads from natural raw materials should not be used for stitching, since in such conditions they will quickly rot. The firmware should be frequent, in several rows (necessarily with nylon threads). The joints of the chain links must certainly be welded or brazed with copper. Electroplating these circuits is optional as it will still wear off after using the bracelet several times. Along with bracelets made of steel chains, there are devices in the form of plastic clamps and rubber tubes, but they are not popular among our motorists. Since our drivers must have everything iron.
If the car is not conceived for off-road assault, but clean asphalt is required for normal movement, then it will not be possible to do without anti-skid equipment.
In the foreseeable history, there are no reliable facts of the first cases of using a snow chain to increase cross-country ability. Most likely, the first analogs appeared on trucks operating in a column in muddy mud or snow. Experience with snow chains for trucks Attempts were made to wrap pieces of chains and cables around the wheels of tractors and light tugs on the roads of the First World War. Of course, most of the early snow chains were handmade.
Today, a large part of motorists make various versions of snow chains with their own hands, record the process on video and upload it to the Internet.
Anti-skid chain structures
The effect of increasing the cross-country ability of the car is based on increasing the grip of the tire of the wheel with a dirt or snow base, making it more reliable. The chain links act as lugs with a large area of \u200b\u200bcoverage of the snow or mud mass. On the other hand, under the weight of the wheel and the machine, the pressure of the chain links on the road surface - ice, snow or soggy soil - increases hundreds of times, due to which the supporting surface is compacted and adhered to the wheel. A simple anti-skid device allows you to control the movement of the vehicle and double the traction.
The working area of \u200b\u200bthe snow chain is a tape of interconnected fragments of 15-20 links, forming a diamond-shaped, staircase or diagonal pattern. A denser pattern may simply make the fixture bulky. Depending on the design, the belt is fastened with two cables or wire rings, pulling the ends of the fragments on both sides of the wheel, thereby securing the working surface on the tire tread. A frame lock or latch is usually used to secure the tension. The effectiveness of the pattern in anti-skid resistance is assessed differently.
The most important characteristics of snow chains:
- the strength of the links, high quality metal and welding, the presence of a protective coating that can minimize corrosion;
- make the least amount of manipulations during installation, the chain must be fixed by closing one or two locks;
- the absence of elements capable of damaging the suspension assemblies, calipers or tire rubber.
Sometimes, to increase the anti-slip effect, the links can be made from a bar or wire not of a circular cross-section, but of a square or rectangular one.
Homemade snow chains
If you look closely at the snow chain in the photo and carefully study the tensioning system, it becomes clear how to make snow chains with your own hands, especially if there is a video of the manufacturing process. To put it simply, it is necessary to make a kind of net from chain sections to the size of the tire, with a system tension mechanism. Usually, for manufacturing, the dimensions of the sidewalls and cross sections are measured with a margin of 1 link and the length of the cable is determined with which it is supposed to pull the chains on the wheel. In the simplest version of the chain, you can use an ordinary household chain, with a bar diameter of at least 5-6 mm, with reliably welded links.
A pair of M10 or M12 bolts is used as a tensioning device. As a side attachment, you can make a wire arch, or you can use a cable from the handbrake drive of the car, having previously completed the loop at the ends to thread the tension bolt. Sometimes homemade snow chains are made from different materials, for example, Kevlar and polyamide straps are used to fix and tighten.
Differences between industrially manufactured anti-skid devices.
Unlike home-made options made with your own hands, industrial designs are forced to compete in the market, which means that they need to be made more convenient and reliable through the use of:

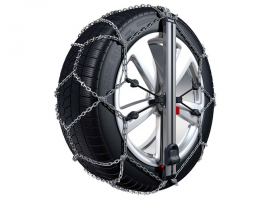
As an illustration, we can cite products - classic snow chains from Pewag, one of the oldest in Austria, or trackers - Mita snow chains. The latter are installed in the tread groove, fastened individually, all operations can be done with one key. The efficiency is not worse than the classic version, but the cost of a set weighing 9 kg is about three times more expensive.

One of famous brands were Thule snow chains in classic design. The design uses a diamond pattern with external asymmetry, which makes it possible to effectively provide traction on ice. Mounting on the wheel is carried out with the help of a special arched device and a central aluminum stand, which provide automatic tension of the fragments and quick removal in several movements. To prevent possible damage to the disc, a protection made of synthetic wear-resistant material is additionally installed.
Which is better - chains or anti-skid bracelets
Besides unusual idea trackers of Mita, among the anti-skid devices, snow chain bracelets stand apart. The idea of \u200b\u200ba unitary device, cheaper, more versatile and easier to use, has long demanded its implementation. What are the advantages of an anti-slip bracelet?

Firstly, versatility and flexibility of use. The bracelet is easier to put on the wheel, you can easily adjust the number of installed devices, the rubber of the wheel suffers much less.
Secondly, they are made on the basis of high-strength rubber, Kevlar fibers, wear-resistant polymers and, as a result, are much lighter than steel chain devices. The bracelet is easier to repair and maintain, the rubber pad studded with high-strength sintered metal or carbide spikes is easier to repair than if it were an all-metal construction.
Among the disadvantages of bracelets, one can note the higher cost and the danger of making sharp turns at a speed of more than 20-25 km / h, in any case, after overcoming snow or mud obstacles, they must be dismantled.
Classic chain devices have a longer service life, are cheaper and heavier to use. For classic off-roading, this is the best option.
DIY truck snow chains
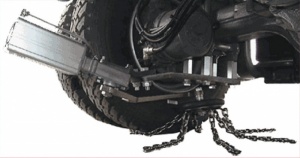
Anything that makes it possible to combat truck slippage will make its work more reliable. Both conventional classic snow chains and original ideas - automatic snow chains for trucks - are widely used. One of the representatives of automatic devices, ONSPOT VBG, is remotely controlled, the design allows you to make a connection using a pneumatic actuator controlled from a remote control in the driver's cab. It is used at a speed not exceeding 50 km / h. The efficiency of the machine and its reliability are slightly lower than the usual snow chains for trucks, but the machine will make the application safer.
In order to make a chain anti-skid device with your own hands, you should:
- correctly measure the length and width of the tread of the wheel around the circumference of the tire;
- make two blanks of ring mounts for wheels. They will be located on either side of the disc. One of the fasteners is detachable with a lock - for tensioning and fixing the chains from the outside of the wheels. The second fastener is also detachable, but instead of a lock, hooks are made at the ends of the ring blank, allowing the fastener to be closed into a ring;
- we cut the blanks - 8-9 pieces of chains of transverse chain segments and pass the wire of the ring fasteners through the last links;
- to facilitate the installation of the snow chain with our own hands, we replace one of the chain segments with a piece of wire with a diameter of 7-8 mm, bend it in the form of an arch and weld the ends to the ring wire fasteners .
How to put on snow chains with your own hands
Dressing her is not particularly difficult, but it requires work, accuracy and attention. First of all, the chain is laid out in front of the wheel, locks on the outside and hooks on the back of the chain on the inside of the wheel. We run over the device so that from the end of the unfolded device along the track to the point of support of the wheel on the snow or ground is about 20-25 cm. We throw the rest of the chain system onto the wheel and carefully straighten all the elements. Then the hook is hooked with inside wheels and the outer lock is closed. If the chain has a tension adjuster, everything must be done to increase the tension and take out the slack.
Video how to install snow chains:
Automotive snow chains are a kind of replaceable tread that makes it possible to transform an ordinary road tire into an icy or off-road tire. Structurally, this snow chain consists of two longitudinal chains or cables - external and internal, passing around the circumference of the wheel, which are connected by transverse chains or rubber "lugs", which significantly increase the grip properties of the wheels (and, accordingly, the vehicle's permeability) on ice, on loose snow, deep mud, etc. In practice, it may look like this. You go fishing - drive 100 km on an asphalt surface on ordinary tires, and then turn onto a country road, where the very "hard off-road" begins. Then you put on snow chains - and you can continue driving, having much less chance of slipping or getting stuck in the mud. And places such as, for example, icy steep climbs, without snow chains, are very difficult to overcome, even on studded tires.
Riding with chains. Types of snow chains.
Snow chains are divided into two classes: "hard" and "soft". In the former, the chain itself is used as crossbars, and in the latter, reinforced rubber "lugs".
There are two basic types of patterns: "ladder" and "rhombus / honeycomb". In the first, longitudinal chains / cables are connected in straight transverse pieces, in the manner of a rope ladder. In the "diamond" they are connected obliquely, getting a "spider web" pattern. Snow chains differ in the size and shape of the links (or lugs). Various materials are used to make snow chains, such as steel, titanium (very expensive), aluminum and reinforced plastic. Sometimes the chains are additionally reinforced with metal spikes.
It is definitely impossible to say which snow chains, or which pattern is better. Since it all depends on the conditions where they are used. Thus, “hard” chains are better adapted for off-road conditions than “soft” ones, but they do not allow moving at a speed of over 50 km / h. "Soft" make it possible to move at speeds up to 80 km / h and much less than "hard" wear out rubber. Therefore, for those who left the highway and went to knead deep off-road, the "hard" option is better suited. For those who drive where there are constant alternating sections of flat roads and muddy snow, “soft” chains are more suitable.
The same can be said for the dimensions of the chain links. The larger the link, the higher the off-road qualities, but more weight, worse driving on a flat road and more wear on the tire.
Riding with chains. Which cars can be fitted with chains.
When it comes to car brands, snow chains can be used on almost any car. Except for some sports, purely track cars. When it comes to tires, it must be said that "hard" chains are not suitable for low profile tires. But "soft" can be used.
Snow chains also differ by car class, for cars, for SUVs and for trucks. But here, first of all, the size of the wheel plays a role: the chain covers from two to four standard sizes along the radius. In addition, for SUVs and trucks, chains are made with large links, often additional spikes are installed.
It is not necessary to install snow chains on all wheels of the car - you can only install on the drive axle. This is advisable when driving on not very off-road, when used from time to time, as well as to overcome problem areas of a country road.
Riding with chains. How to put on the chains.
In order to put snow chains on the wheels of a car, they are laid out in front of the wheels of one axle exactly along the axis of movement, so that the locks on the outer side chain come out to the outside and are facing forward. The rear side chain hook should be on the inside. It is necessary to run over with the wheels on the chains so that they stop 20-30 cm from their end. After that, you should put most of the chain on the wheel and hook the hook on the inside. Then you need to straighten all the links on the wheel (for "soft" ones - put on the adjusting cable / chain), and then hook the lock on the outer side chain. It is necessary to make the "rolling" of the chains, having driven 10-50 m so that the chain settles down, and then tighten the locks again.
Experienced drivers put on chains in five minutes, and it's no more difficult for them than tying their shoes. But for many motorists, especially beginners, putting on snow chains turns out to be the main "stumbling block", and there are many who refuse to use them precisely because of this procedure. In any case, before using the chains, you should first practice putting them on somewhere on a dry site, then it will be easier on the road.
As for tire wear, it should be noted that all chains wear out rubber quite a bit. "Hard" are more, "soft" - less. Wear also depends on the frequency of use of the snow chains. The rubber actively begins to "eat up" during prolonged driving "in chains" on a hard road, sharp braking and acceleration, with too weak adhesion of the chains to the wheel.
As for the safety of driving a car with chains, here the danger is presented by violations of the operating instructions and faulty chain locks. When driving with chains, do not exceed the speed prescribed by the instructions for the chain. In this case, centrifugal force can cause the chain to break off the wheel and hit the wheel arch or tear the tire. In the worst case scenario, if the chain lock breaks, it can catch on suspension parts (such as a lever), which can lead to serious damage and even an accident. The condition of the links, locks and the reliability of the fastening must be carefully checked before using the chains.
Anti-skid chains. Where to buy and how much do they cost?
Snow chains are quite simple to make, and therefore many metalworking companies make them. Well-known foreign brands include RUD (Germany) and Pewag (Austria). From Russian - "Metalist" and "Krasny Yakor". Average price of a set of two snow chains, for passenger car $ 200-250, and $ 250-300 for an SUV. Although in the automotive markets, it is easy to find cheaper chains, both Chinese and ours.
Snow chains video
Circuit testing videos.
UAZ on snow chains.
Lada with chains, video:
Chevrolet Niva on snow chains.
Video: putting on a chain on a car.
› On the prospects of removable lugs to increase the traction of the wheel.
Each design has its own scope of applicability, therefore, in order, as usual, not to compare cucumbers with tomatoes, one must start with the terms of reference and, as usual, theses)
For the bulk of fans of off-road vehicles, this very cross-country ability is required extremely rarely and locally.
A typical route of the so-called automobile expeditions is a tedious rattling of X thousand km along federal highways to the most picturesque swamp, into which then diving takes place with the purpose of pushing, slipping, pulling on ropes, and drinking special drinks designed to relieve pain from the loss of paintwork and more significant structural elements.
When you have to push too hard, and the risk of not being in time for work becomes more tangible, the owner of the mobile still begins to think about increasing the cross-country ability.
(of course, in order to go 50 meters deeper)
What razdatki you need, where to weld what, where to saw off and how best to cut a bogger, and so on, it's not for me to tell you.
You all know better than me.
The whole thing here is that with an increase in cross-country ability, you start to want to ride on this on the asphalt less and less, and more and more come up with excuses why it is more useful to go to a bar today.
And you have to drink too much special drinks at the sight of what the bent tie rod did with the new bogger for X thousand km ...
In general, we again come to the conclusion that there is no happiness, as well as universality.
An idea that many people visit when trying to solve an optimization problem is a replaceable mover.
Well, for example, two sets of wheels.
And immediately swept aside. for they are large, heavy and have nowhere to put them.
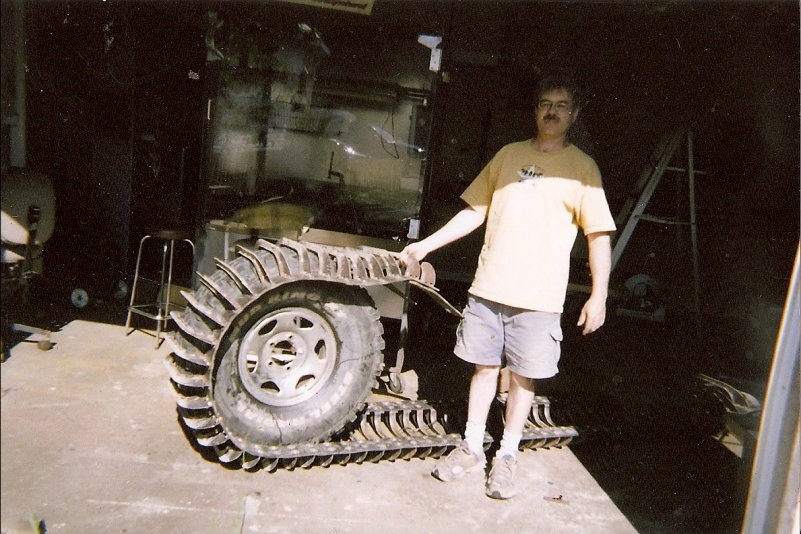
About the same all sorts of caterpillar carts - mattracks - rest.
In the photo, autotourists are driving a replaceable wheeled propulsion unit across the country, in order to eventually replace it with a tracked one.
Let's think better about whether the wheel itself can change its properties.
And for this it is worth asking the question - which ones are needed.
1. Supporting abilities.
Everything is really sad here.
For in order to really at least somehow increase the support, it is necessary to increase the wheel.
Which immediately entails a radical alteration of the car with courageous sawing of precious body parts.
The weight of the wheel rises, the price rises, the ride comfort decreases more and more and the spot area does not want to increase in proportion to the suffering.
Of course there is some kind of effect, the car sinks 5 meters further than before.
In general, whatever you may say, we will be able to increase the supporting permeability in only one way - to throw out excess junk from the trunk along with the interior trim and your favorite teddy bear, as well as reduce the amount of special fluids at least by half.
There is, in fact, another not obvious, but extremely simple idea - to screw an aluminum sheet from below.
I wrote about this in detail, so I will not repeat myself.
But here lies one big but, because of which many do not believe in such a way to increase supporting abilities. ...
This is where all the myths about "sticking" come from.
We lay down on the bath, we don't seem to drown, but we can't crawl, not enough traction!
(This is especially noticeable without axle locks.
We hung a little, one wheel was unloaded and the FSE. we stand skidding.)
Those who have ridden a tracked ATV are familiar with the process.
As you can see, gaz71 drives almost all the time with an emphasis on the bath. well, otherwise, where would the consumption of a liter per kilometer come from \u003d)
Having made this observation, we will smoothly move on to the second point.
2. Traction ability.
Traction ability along with geometry is extremely relevant, especially when considering the typical driving conditions for off-road vehicles.
In fact, for obvious reason, few people try to climb into the swamp, and their main habitat is a variety of dirt roads, where the main obstacle is a soggy top layer with low frictional properties and a track from the Urals with firewood.
And then all of a sudden it turns out that we don't need a super-low fit, most of which can be slipped if there is enough traction.
And we get stuck at 70% because the traction ability of a wheel immersed in a slurry. you get the idea)
And the place where an allocation of 0.05 will help a lot is 1 km out of X thousand. which you can either go around, or throw on bushes, or drag with a winch in sled mode.
(I repeat, I take typical routes for a similar technique such as the infamous Complete Chukhloma)
Reflecting in this vein, the average jeeper changes his beloved bfg at to simex, trying to invariably grab a special liquid after learning that after 5 thousand km a flowerbed will have to be made of it, having driven at least 300 km in the end under those conditions for which everything is started.
I see I'm tired already.
Actually - how simple, cheap and fast it is to increase the traction properties of the wheel at times.
To begin with, the question is - what geometry of the lugs provides maximum engagement with poorly bonded soils?
One should not go far into literature, because the transverse blades, like those of a paddle steamer, should immediately arise in consciousness.
Someone will definitely remember buggies driving into almost vertical slides on the sand or A. Garagashyan's sherpa.
The narrow blade creates a point load, plunges and tries to move the layer. with almost complete analogy, a gear-toothed rack.
Very laconic.
The most important thing is that such lugs will not interfere with the wheel deformation and form an elongated spot.
A little outfit on the model as I see it.
Tire 35 "x10.5"
If you make such a lug from aluminum (thickness 6mm), then the weight of 18 pieces will be 4.2 kg.
Total with all sorts of ropes + 6kg to the wheel. Steel respectively 500g and 9kg
It doesn't even look terrifying ... especially against the background of the bogger.
As you understand, there are still more questions about the resource, form, and fixation than answers)
But this product does not need a large resource at all.
For a typical application is
We drive 2.5 thousand km on asphalt and all sorts of primers on ordinary MT tires. we tie the lugs, poke around the last 50 km along the track, take a photo on Instagram, another 50 km, the tracks in the trunk, and calmly blow 2.6 thousand to the house, continue to shit in the warm unetas and burn in comments.
